
It's what's for dinner...
(Updated from the recipe archives)
I'm a big fan of flank steak and for good reason. It's a great cut of meat on the cheap. Sure I'm extremely fond of a thick, juicy, tender T-Bone, I also really like a New York Strip but I like those steaks cooked over a hot fire grill and there are two reasons I don't do the grilling around here: First, I am a total spaz/clutz and will likely light my hair on fire but the biggest obstacle I face in the grilling department is a certain someone I call my husband otherwise known as The BBQ Assassin. He takes his grilling very seriously and I'm not allowed to touch his BBQ. I'm not totally unconvinced that he loves his BBQ a tad more than me. Don't worry I'm okay with it. I can relate because it's a rare occasion that I ever let him in my kitchen. I don't like him touching my stuff either so we're tied. Anyway, back to the flank.
There happens to be that thing called work in this life therefore I don't always have my BBQ Assassin at my beckon call and that is where this flank steak comes into play. Sure it's delicious when it's grilled but I actually prefer it cooked in a super hot cast iron skillet for a few minutes until it gets nicely charred. Now, the thing about flank steak is that it's a tough cut of meat so it really needs to be marinated in order for it to become tender. My current favorite is this Bobby Flay recipe from his book Bobby Flay's Boy Gets Grill. While the ingredients in this marinade all have strong flavours, surprisingly they lend a nice subtle taste to the steak. Luckily I can enjoy a nice tender steak whether my husband is home or not. Girlfriend likes her steak.
Recipe:
1 1/2 lb flank steak
3/4 cup olive oil
1/2 cup balsamic vinegar
4 cloves garlic, roughly chopped
2 tablespoons fresh rosemary, roughly chopped
Fresh lime wedge (optional)
cilantro, roughly chopped (optional)
Directions:
1. Combine all of the marinade ingredients in a storage container. Place the steak in the marinade. Cover and refrigerate for at least 2 hours, flipping the steak once. Marinade at least 2 hours or up to 8 hours, flipping the steak periodically.
2. Remove the steak from the marinade and pat dry. Heat a cast iron skillet to high heat. Coat the skillet with vegetable oil. Place the steak in the skillet and cook 3 minutes. Flip the steak and cook another 2-3 minutes (if you prefer your steak cooked more than medium rare, reduce the heat to medium and cook an extra 1-2 minutes on each side).
3. Remove the steak from the pan and allow it to rest 5 minutes before carving. NOTE: when carving the steak it's important to carve it against the grain which means finding the horizontal lines of the meat and carving the other way.
4. Serve with a squeeze of fresh lime and a sprinkling of cilantro
Serves 4
Tuesday, June 7, 2011
Balsamic Marinated Flank Steak
Wednesday, April 27, 2011
Mandarin Sorbet

My darling husband got me a Vitamix for Christmas. He also got me the Dirty Dancing Limited Keepsake Edition so he’s obviously a keeper. He may not have felt the same about me though after hearing my initial reaction upon opening the Vitamix. You see, I opened the parcel and said…" we already have a blender." Yep, I sure did. And yep, I sure did feel like a total a@# when I did a little research on this freak of nature machine.
Now, scientific explanation is the furthest of my strong suits so I’ll explain it to you like this; this machine acts as a food processor, cooks AND blends soups at the same time right there in the container. On the other hand it blends AND freezes sorbet at the same time (some kind of freezing mechanism in the motor or something). You can knead bread in it and make your own flour. You can make your own dairy alternatives like almond or rice milk. There are some other things too but that’s all I can process at the moment. Anyway, to say the Vitamix is a remarkable machine is an understatement. Just don’t call it a blender.
The first thing I made with it is this delicious mandarin orange sorbet.
Recipe:
4 large mandarin oranges, peeled and halved
3 tablespoons sugar
4 cups ice cubes
tiny splash vanilla
Directions:
1. Place all ingredients in the vitamix in order as listed. Secure lid.
2. Select variable 1. Turn machine on and quickly increase speed to variable 10, then to high.
3. Use the tamper to help push the ingredients into the blades.
4. In about 30-60 seconds the sound of the motor will change and four mounds should form.
5. Stop the machine. Don’t over mix or the sorbet will melt.
Serve immediately.
Friday, April 22, 2011
Blue Cheese Oysters Rockefeller

After spending 4 months in the hospital and having to endure countless hospital meals I was looking for something super tasty. Enter Oysters Rockefeller. After searching for traditional Osyters Rockefeller recipes and keeping with my belief that everything tastes better cheese I decided on a buffalo blue cheese Oysters Rockefeller. Take a deep breath. Breathe! I know, it sounds overwhelming and it should because these little gems are heaven right here on earth. I kid you not.heaven. These beauties are great for any celebration and they totally hit the spot.
Recipe:
12 freshly shucked oysters
1/2 cup breadcrumbs (I used corn flake breadcrumbs and highly recommend them if you can find them)
1 tablespoon parsley, minced
1 tablespoon celery leaves, minced
1 teaspoon green onions, minced
1/4 teaspoon garlic, minced
1/2 teaspoon lemon zest
1 teaspoon butter, melted
1/2 teaspoon black pepper
1/4 teaspoon salt
blue cheese
Directions:
1. Preheat the oven to 500 degrees.
2. Shuck the oysters and save as much of the liquid as possible. Keep oysters on the largest of the half shells.
3. Place all of the ingredients except the oysters and blue cheese in a bowl and mix thoroughly.
4. Cover the oysters equally with the breadcrumb mixture.
5. Crumble about 1 teaspoon of blue cheese over the breadcrumbs of each oyster.
6. Place the oysters on a baking sheet trying to make sure that they stand upright.
7. Place the oysters in the oven and bake for 6-8 minutes, depending on your oven until the breadcrumbs are golden brown and the cheese has melted.
8. Serve with buffalo hot sauce and lemon wedges.
Thursday, March 31, 2011
Chinese Style Lemon Chicken

Time to lighten thins up around here. Me and my lemons, well me and lemons are total B.F.F.‘s. You know, best friends forever. The lemon has never let me down and is always there for me whether it be when I need a lemon tart, lemonade or in this case lemon chicken. I love lemons. In fact I love them so much I even planted a lemon seed, which I have tended to lovingly since it’s first sprout. It has grown into a pretty little plant which I hope will turn into a tree and subsequently in 12-15 years I will actually have a lemon, fingers crossed. I’ll let you know. So, it’s Spring, my favorite season. It’s beautiful, it doesn’t get dark at 4:30pm anymore and if nature decides it’s time to lighten up, I say I will happily follow suit. This lemon chicken screams Spring. It’s light, bright and refreshingly easy. I love my lemons like I love my Spring-always and forever.
Recipe:
1 lb chicken, cut into 1" cubes (I used boneless skinless chicken thighs)
1 egg white
2 teaspoons cornstarch
1/2 teaspoon salt
1/2 teaspoon pepper
Sauce:
1/3 cup lemon juice
2 teaspoons soy sauce
1 teaspoon rice wine vinegar
1/4 teaspoon minced ginger
4 teaspoons honey
2 teaspoons sugar
Directions:
1. Combine all of the sauce ingredients together and set aside.
2. Combine chicken, cornstarch, egg white and salt and pepper in a mixing bowl. Set aside at room temperature for 15 minutes.
3. Heat a large wok or saucepan to medium high heat and add enough oil to coat the bottom of the pan. Place the chicken in a single layer in the hot oil making sure you don’t crowd the pan. You may have to work in batches. Once you have placed the chicken in the pan cook on one side without touching the chicken for 2-3 minutes, flip the chicken and cook another 2-3 minutes. Remove the chicken and set aside.
4. Add the sauce ingredients to the wok, increase heat to high and simmer the sauce for 2 minutes. Return the chicken to the simmering sauce and simmer 2 minutes or until the sauce has thickened and the chicken is reheated.
Serves 4.
Sunday, January 30, 2011
Pancetta Pizza with Mushrooms, Olives and Goat Cheese

The Super Bowl is next weekend so if you or your significant other are sports fans you're probably preparing your menu as we speak. One of my favorite game day foods is making my own pizza. I make pizza quite often and one thing I’ve come to learn is that where toppings are concerned, less is more. Now, you will instinctively want to load up the toppings, I’ve been there too but this is really a time to show restraint. Trust me, you’ll thank me later. The great thing about pizza is obviously its versatility; make whatever kind you like but it’s also so simple. Making your own pizza is fun and delicious, a break for the ol’ bod that lets me know I’m not 18 anymore every time I indulge in deep fried love. And while I know I’ll never learn to be a sports lover at least I’ve found a way to entertain myself through a certified lifetime of being married to one.
Now please excuse me while I begin preparations for my Superbowl Snack Food Stadium. This 27 (ahem 31, almost 33) year old body has no idea what’s in store for it next weekend. Probably best to eat nothing but wheatgrass and bean sprouts for the next week in preparation.
Dough Recipe (makes 4, 13" pizza crusts):
1 envelope active dry yeast (or 2 1/4 teaspoons)
2 cups warm water (90° to 105°)
1/2 teaspoon sugar
4 cups all-purpose flour, plus more for kneading
2 1/2 teaspoons kosher salt
Extra-virgin olive oil
cornmeal for dusting the stone or pan
Directions:
1. In a large bowl, mix the yeast with 1/2 cup of the warm water and the sugar and let stand until foamy, about 5 minutes. Add the remaining 1 1/2 cups of warm water, the 4 cups of flour and the kosher salt and stir until a soft dough forms. Turn the dough out onto a well-floured work surface and knead, adding flour as necessary until a silky, but soft dough forms. Use a pastry scraper to help knead the dough. Transfer the dough to a lightly oiled bowl and brush all over with olive oil. Cover the bowl with plastic wrap and refrigerate overnight or for up to 3 days.
2. Transfer the dough to a lightly floured surface; punch down and divide into 4 pieces. Form each piece into a ball. Rub each ball with oil and transfer to a baking sheet. Cover the balls loosely with plastic wrap and let rise in a draft-free place for 1 hour.
3. Meanwhile, set a pizza stone in the oven and preheat the oven to 500°, allowing at least 45 minutes for the stone to heat. If you don’t have a pizza stone use a baking sheet but the pizza stone creates a crispier crust.
4. On a lightly floured surface, stretch one ball of dough into a 13-inch round, using a rolling pin if needed to achieve a thin crust ; transfer to a floured pizza peel or large cutting board, adding flour where the dough sticks. Spread 1/3 cup of tomato sauce evenly over the dough leaving a 1 inch border. Sprinkle the mozzarella cheese over the pizza followed by the mushrooms then pancetta and finally, crumble the goat cheese over the pizza. Sprinkle with salt and pepper and a slight drizzle of olive oil over the entire pizza.
5. Lightly sprinkle the surface of the stone or pan with cornmeal. Immediately slide the pizza onto the stone and bake for 8-10 minutes or until the cheese is melted and the crust is golden brown. Remove the pizza from the oven and let stand for 3-4 minutes before slicing to allow the cheese to set.
*Note: you can easily freeze any leftover dough by wrapping it in cling wrap and storing in an airtight container or ziploc bag in the freezer. Remove from the freezer when you are ready to use it and thaw at room temperature. Or simply reduce the dough ingredients to your specified requirements.
Toppings for 1 13" pizza:
1/3 cup Jamie Oliver’s Quickest Tomato Sauce
1/3 cup mozzarella cheese, shredded
1/4 cup goat cheese
6 mushrooms, rubbed clean and roughly chopped
4 slices pancetta, roughly chopped
6 kalamata olives, pitted and roughly chopped
Wednesday, January 19, 2011
Sweet Potato and Yam Gnocchi with Brown Butter Sage Sauce

This season brings some of the most fantastic flavours of the year. It also gives us an opportunity to crank up the oven for more than 10 minutes without passing out from heat exhaustion. I was inspired by the beautiful colour of the yams at our Farmer’s Market. I knew I had to come up with something new and these gnocchi fit the bill perfectly.
The aroma that filled my house when I was roasting the sweet potato and yams was enough confirmation that I was on to something special. After mashing them both together I could have eaten them with pure joy just the way they were. But I had gnocchi on my mind and good thing because man, they were one of the best things I’ve tasted in a while, I absolutely loved them. Thankfully this recipe makes a lot so I was able to freeze a batch to have on hand. Read the note below for instructions on freezing. You’ll want to have these at the ready for you. Trust me.
Recipe for Gnocchi:
1 large sweet potato
2 medium sized yams (the sweet potato/yam pulp should equal 3 cups)
2 eggs, lightly beaten
2 + cups flour, plus more dusting
salt and pepper to taste
pinch of nutmeg
pinch of cinnamon
Directions:
1. Preheat oven to 400 degrees. Prick the sweet potato and yam with a fork all over. Place them both on a baking sheet and roast for about an hour, flipping half way through. Bake until they are very tender.
2. Remove from oven and allow to cool. Once cooled, remove the skin from both. Place the pulp in a large mixing bowl and using a potato masher or fork, mash the pulp completely together. At this point season the pulp mixture with salt and pepper to taste and mix in the nutmeg and cinnamon. Add the eggs to the mixture followed by the flour. You may need more flour to make the dough come together. The consistency should be soft and sticky but not wet keeping in mind you will be adding more flour while you’re rolling out the dough.
3. Dust a large surface with flour, separate the dough into 4 pieces. Take one piece of the dough and roll it out on the floured surface into a long roll about 1" thick. Cut the dough into 1" pieces. Using the tines of a fork, gently press into the top of the pieces to make a slight indent. Place the gnocchi on a floured baking sheet and either place in the freezer for future use or set aside while your water comes to a boil. Repeat with the remaining 3 pieces of dough.
4. Bring a large pot of water to a boil. Place the gnocchi in the boiling water and stir immediately, keep stirring until the water returns to a boil. The gnocchi are done as soon as they float to the surface of the water. Make sure you don’t overcook, it should only take a few minutes. Remove the gnocchi and stir into the sauce (sauce recipe below). Serve with freshly grated parmesan cheese.
*Note: To freeze the gnocchi, place the individual gnocchi on a floured baking sheet and place in the freezer. Once the gnocchi are frozen place them in a freezer bag. To cook once frozen simply place the frozen gnocchi in boiling water and remove them once they float to the surface.
Recipe for Brown Butter Sage Sauce:
4 tablespoons butter
8 large sage leaves, cut into thin strips
2 tablespoons lemon juice
Directions:
1. Melt butter in a saute pan. Cook over medium heat until the butter becomes golden brown. Add sage leaves and lemon juice remove from heat. Serve over pasta.
Wednesday, January 5, 2011
Panko Breaded Shrimp with 3 Dipping Sauces
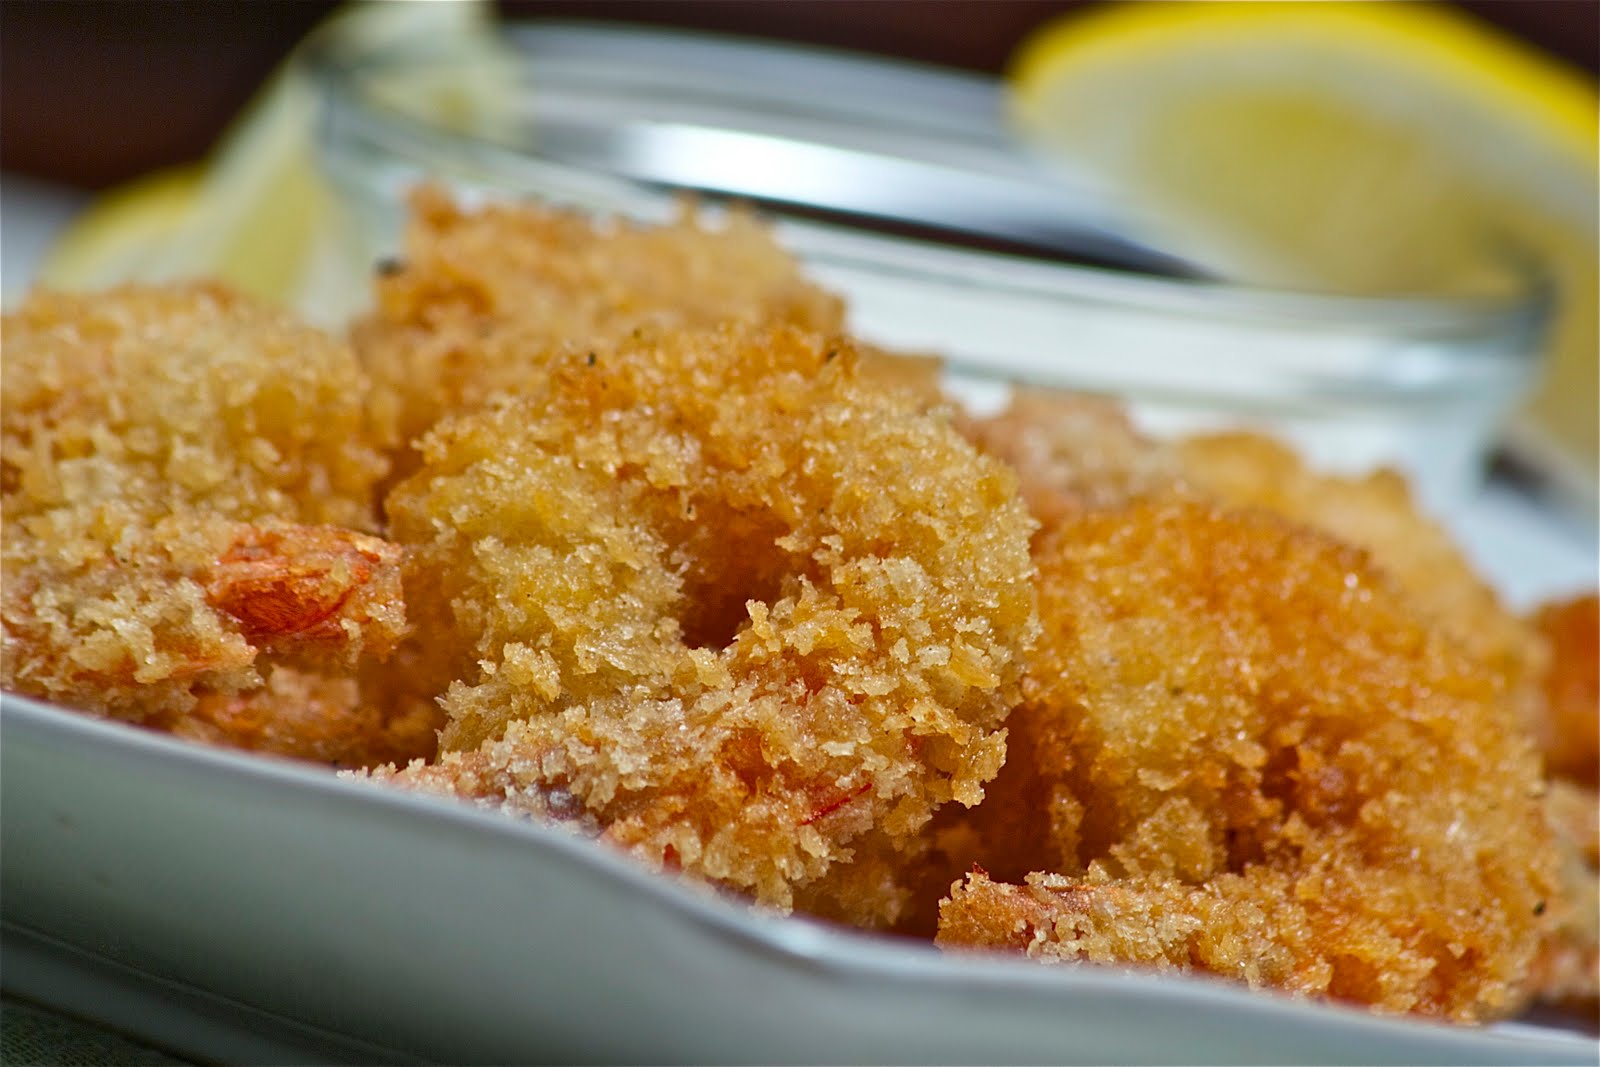
I don't make New Years resolutions because quite frankly, I don't like the pressure and when I tell myself I can't have something, I want it even more. That last quality does not exactly coincide with my major lack of will power especially with guilty food. So while I make myself eat healthy most of the time, when I want something good, I'm gonna have it. And it most often includes something deep fried. Now these shrimp, ooooh baby, these shrimp rock my world. They're sweet, crunchy, juicy and totally hit the spot. When I make them I fry up a large batch and serve them with my 3 favorite dipping sauces (I can never just pick one). That's another of my bad qualities - indecisiveness. But one thing is for sure, I never have to think twice about indulging in these beauties.
Recipe:
20 large shrimp, deveined, cleaned and shells removed leaving the tails on
1 cup flour
1 teaspoon salt
1/2-1 teaspoon black pepper
2 eggs
1/2- 2 cups Panko breadcrumbs (can use regular dried breadcrumbs but they won't be as light and crisp)
1 quart oil for frying (such as vegetable, peanut or grapeseed
Lemon wedges, for garnish
Directions:
1. Heat oil in a deep, heavy pot or fryer on stove. Oil should be 3-4 inches below the top of the pot. Heat oil to 375 degrees.
2. As if working in an assembly line, In one bowl mix the flour, salt and pepper. In another bowl add the eggs and beat lightly. Put the bread crumbs in a third bowl. Working in batches, dredge the shrimp in flour and shake off excess, dip the shrimp in the egg again shaking off excess, then into the bread crumbs to coat thoroughly. When you have 6 breaded add them to the hot oil making sure not to crowd the pan. Let them fry, turning once, until golden brown about 3-4 minutes per side. Remove with a skimmer or slotted spoon. Put on a wire rack lined with paper towel with paper towel and repeat with the remaining shrimp.
Dipping Sauces:
1. Chili Mayo:
1/2 cup mayonnaise
1 teaspoon chili sauce such as sambal oleck (more or less to taste)
1 teaspoon lemon juice
Mix all ingredients together and refrigerate until needed.
2. Homemade Cocktail Sauce
3. Sweet Chili Dipping Sauce
Thursday, December 30, 2010
Spinach Salad with Lentils, Blue Cheese, Bacon and Walnuts

From the recipe archive December/09 because I've made this delicious salad a million times since and I'll be making it again this year. Happy New Year!
I'm not superstitious per say. Sure I'll do a little knocking on wood every once in a while but I'm not fanatical about it. Since I got married last year and we bought our first house, I decided that I wanted to create some traditions for this new little life of mine. We had our first traditional Christmas at our house this year and started collecting some sentimental decorations. Tomorrow, New Years Day we go on a once a year binge at McDonald's (and then regret it terribly afterwards) but I needed a New Years Eve tradition and I thought this sounded fun when I came across this article on Epicurious about lucky foods to eat on New Years Eve. (Which incidentally is when I got engaged at this time last year. Whoot Whoot!) There are a lot of great ideas in the article for ringing in the new year with luck but I decided to go the lentil and pork route in the form of a spinach salad with lentils bacon and blue cheese. Four of my favorite things. The salad will be accompanied by a grilled T-Bone steak so make that five of my favorite things. I feel lucky already.
Happy New Year everyone! Thank you for all of your support. I hope I've inspired some of you to try out a new recipe, perhaps when you thought you couldn't make it, much like I did not too long ago. I look forward to hearing from all of you in the new year and wish you and your loved ones a world of blessings.
Cheers!
Madeline
Salad Recipe:
1 bunch of spinach, rinsed thoroughly and dried (about 4 cups spinach)
1/4 cup dried lentils, picked over and rinsed
4 slices bacon, cooked, crumbled and cooled to room temperature
1/4 cup blue cheese, crumbled
1/4 cup toasted walnuts (see below for toasting instructions)
8 or so mandarin orange wedges
1. Bring a medium sized sauce pan of water to a boil. Add the rinsed lentils, reduce heat to a simmer and cook lentils about 20 minutes or until tender. Once tender, drain the lentils, rinse with cold water and allow the lentils to cool and dry a little, about 1 hour.
2. Place the spinach in a large bowl. Add the vinaigrette and toss to coat. Plate the salad by placing a large bunch of spinach on a plate, sprinkle a portion of the lentils on the spinach followed by the blue cheese, bacon, walnuts, mandarin oranges.
Maple Orange Vinaigrette:
2 tablespoons maple syrup
3 tablespoons orange juice
1/4 cup olive oil
1/2 teaspoon freshly cracked black pepper
1. Mix maple syrup, orange juice, black pepper, whisk in the olive oil. Serve over the salad and toss to coat.
Toasting Walnuts:
1. There are a few ways to do this:
a) Place the walnuts in a skillet over low-medium heat and gently toast the walnuts, stirring occasionally, until they are fragrant, about 8 minutes.
b) Spread the walnuts on a plate and microwave on high heat for 4-5 minutes or until fragrant.
c) Preheat the oven to 350 degrees. Place the walnuts on a baking sheet and toast in the oven for 8-10 minutes or until fragrant.
Whichever way you choose to toast the nuts just be sure to keep a close eye on them as they will burn very easily.
Serves 2
Wednesday, December 22, 2010
Roasted Brussel Sprouts

If you're like me, you've had one too many mushy boiled brussel sprout dishes. I don't know how many times I've shown up for Christmas dinner and dreaded the passing around of the brussel sprouts. I too am guilty of butchering the poor little cabbage heads though because I didn't really know of any other way to make them. However, as many times as I've had to endure the mush, I always wanted to like them. I'll need you to trust me here. Roasting the brussel sprouts takes them to a whole new level and it's a delicious place to be. They become nutty and crisp on the outside and tender on the inside. I'll be making extra this year for Christmas dinner in hopes of having leftovers. Yes, I actually just said that about brussel sprouts. Happy Holidays!!!
Recipe:
1 lb brussel sprouts
3 tablespoons olive oil
1/4 tsp each salt and pepper
1 tablespoon butter
Directions:
1. Preheat oven to 400 degrees. Peel the first couple of leaves from the brussel sprouts and trim off the rough bottom stems.
2. Place the brussel sprouts in a large baking dish so they are in a single layer. Drizzle with olive oil and salt and pepper. Toss to coat. Dot the brussel sprouts with butter and place the dish in the oven.
3. Roast for 30 minutes (or until fork tender) tossing with a spatula every 15 minutes. Remove from oven and serve.
Friday, December 17, 2010
Rosemary Parmesan Savory Shortbread

From the recipe archive: Perfect for the holidays...
I messed up. It's not often that I mess up but I did...Oh man that was fun, I couldn't even keep a straight face typing that because messing up is a huge part of my daily schedule. I am the biggest clutz ever. Surprisingly, I was a ballet dancer for years and years which generally requires grace and the whole clutz thing has caused my ballet teacher mother much dismay. But I play my part and put on the "never trip over over myself" (in public) part quite often.
The other day though, I tripped up in the kitchen making crackers. Tragic, I know. I used way too much butter and they essentialy baked like a shortbread. I was pretty bummed. I was looking for a crisp cracker but you can't always get what you want and sometimes that's a good thing because there are such things as "happy accidents". It seems like happy accidents happen to me when I'm trying too hard to figure things out. I was trying too hard with these crackers when really they wanted to do their own thing. And they did. What I thought was a total failure turned into a perfectly delicious accident. Basically a savory shortbread was the outcome and it was fantastic. So for all of the times that things don't work exactly the way I want them to, thank you kitchen gods. I will continue to appreciate that you probably know better than I do.
Recipe:
8 tablespoons unsalted butter
1/2 cup grated Parmesan
1 1/4 cups all purpose flour
1/4 teaspoon salt
2 teaspoons finely chopped fresh rosemary
Directions:
1. Using either a hand mixer or electric mixer, beat the butter until creamy. Add the remaining ingredients and mix until the dough forms a ball.
2. Place the dough on a lightly floured surface and roll in a log, 2 inches in diameter and aproximately 12 inches long.
3. Wrap the dough in plastic wrap and place in the freezer for 30 minutes or refigerate overnight.
4. Preheat the oven to 350 degrees.
5. Cut 1/4 inch sliced rounds of dough and place on a baking sheet. Bake for about 20 minutes or until lightly browned. Remove from oven and cool completely on a wire rack.
Subscribe to:
Posts (Atom)


